- Stronger Customer Relationships
- +1-949-878-7411
- ramana@varasi.com
Implementing Checklists in Salesforce – Look Beyond Task Management

Checklists are used in many industries to ensure that standard practices are followed. The usage of checklists in aviation, software engineering and surgical procedures is very well known. It brings consistency and predictability while executing complex processes. It also helps keep track of task ownership. The use of checklists in Customer Relationship Management can significantly improve the effectiveness and efficiency of various relationship-building tracks.
Salesforce is a very powerful platform that provides various tools to implement simple or even advanced checklists. The most basic checklists in Salesforce CRM can be set up as a list of tasks assigned to task owners. In this article, let’s look at a few different ways in which checklists can be implemented in Salesforce.
A very rudimentary approach is to create a Checklist Item custom object and associate it with your object of interest (Account/Contact) through a Master-Detail relationship. This Checklist Item custom object will have the name of the checklist item, its status, due date, owner and so on. This enables you to add a few checklist items against an account on a need basis. But this is nothing more than a long list of tasks entered as checklist items. To really get the benefit of organized checklists, we need to add some more details to this.
Basic Approach
A better checklist can be created using a basic 2 step Parent-Child approach.
- You create a parent Checklist object. This object contains the following fields:
- Checklist Name
- Master Detail of the object with which this checklist will be associated. For e.g., if this is an account checklist then you will have an Account Master-Detail field
- Any other checklist level fields such as overall owner and type of checklist as a picklist.
One can create a new Checklist record on Account to make a checklist.
- You then create a child Checklist Item object. The Checklist Item object will capture the actual checklist items in the checklist. This will be the child of the parent Checklist object. This object can have the following fields:
- Checklist item name
- Status
- Owner
- Due date
With these parent-child objects, you will be able to organize the items into various types of checklists. This is a more organized approach than the first one. But you still need to enter the checklist items manually every time. What if many such checklist items are already standardized and you want to automatically create such items against an account when a new account is created? e.g. you have an account onboarding checklist that you want to associate with an account on creation. For this, you need checklist templates that can be instantiated rather than created from scratch.
Reuse Checklists with Templates
You create a pair of template objects, similar to the above parent-child relationship. Let’s call them Checklist Template and Checklist Template Item. These template objects can be pre-populated with a few standard checklists and their items. These templates can now be used as a source to auto-populate the Checklist and Checklist item object against an account. The auto-creation of checklists and items can be achieved using Salesforce platform tools such as Flow or Apex.
This checklist can be further enhanced by automatically creating a Task for each checklist item and assigning the task to a default owner as defined in the Checklist Template Item object. The task status can then drive the completion of the checklist. Here is an example from our Account Management app
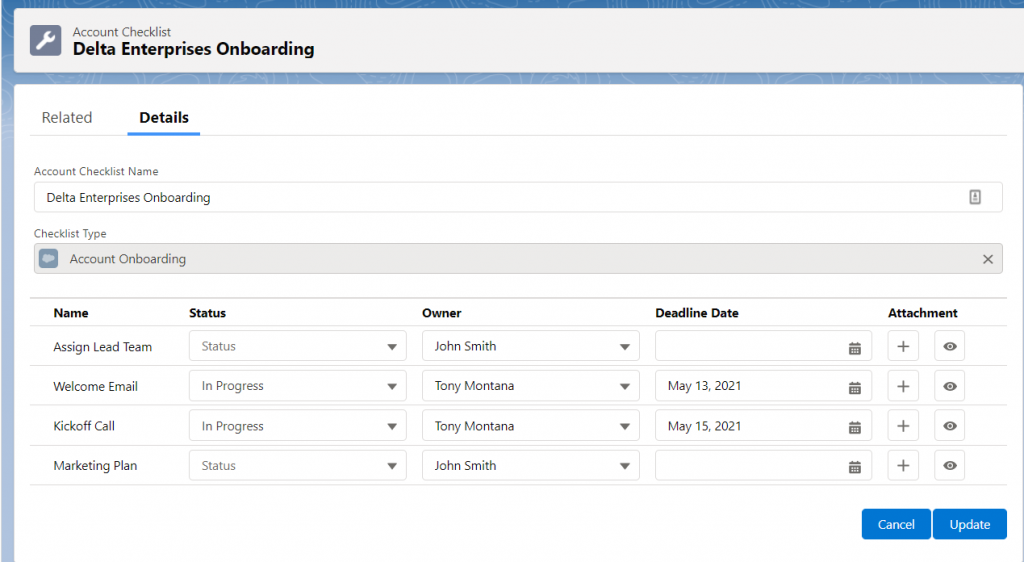
Image 1: Account onboarding checklist
This way, checklist templates can be set up which are automatically assigned to an Account on key account events e.g. an onboarding checklist on account creation, a transition checklist when handing over account ownership from sales to operations, a business review checklist before every quarterly review with customers.
Optimize the Design
Let’s take this one step further. The above design approach could cause a large amount of records to be generated. Let’s say a customer is using Salesforce to manage their operations. As part of various operations activities, they use multiple checklists per month for every active customer. If each of these customers needs to have 5-6 checklists per month with 10-15 items each, then you are looking at creating 50-100 checklist item records per customer per month! This is not a problem if there are only a few customers. But if the number of customers is high then you are going to end up creating a large number of records just for tracking individual checklist items.
One way to reduce the record volume is by flattening the design – create 1 record per checklist which includes all its items as fields. You will need to know all checklist items beforehand which you can configure as fields. But this won’t work if you want to give customers the flexibility of configuring checklist items on their own. To solve this, you can implement checklists based on dynamic column mapping. The approach works as follows:
- Create a checklist object with say 50 checkbox columns
- Create a column mapping object which will map a Checklist Template Item to a column in the Checklist object.
- When creating a Checklist Template, add a step to “Activate” a template. Once activated, the template cannot be modified. This activation step creates records in the mapping object with checklist items for column mapping. This mapping is fixed now since the activated checklist template cannot be changed.
- Now, when multiple checklists are automatically created against an account, each checklist instance creates only 1 record with all items included in the same record. The checklist display lightning component needs to take care of displaying the correct labels for the checkbox column based on the mapping object.
Checklists can be an easy but powerful tool to ensure best practices are followed by the entire team leading to predictable processes and better data. You can determine the design and implementation approach based on the customer’s needs.
Team Varasi


