- Stronger Customer Relationships
- +1-949-878-7411
- ramana@varasi.com
Salesforce CI Using Azure DevOps

Development teams in an organization focus on building software. Whereas the Operations team (IT, System Admins etc.) is responsible for ensuring stable and reliable software environments. Predictability is the key yardstick by which the operations team’s success is measured. Predictably managing multiple environments like QA, UAT, Production and support while continuously deploying new software versions released by the development team needs a well thought through strategy, robust processes and good devops tools.
Salesforce DevOps Center lets you work with a repository for your metadata and organize and automate the change/release management. It currently supports only GitHub.com hosted repositories. Other git based source control providers are currently not supported. Among the unsupported git repositories, Azure Repos is a popular choice. In this article we will see the steps needed to set up a simple Salesforce DevOps process using Azure DevOps Pipelines.
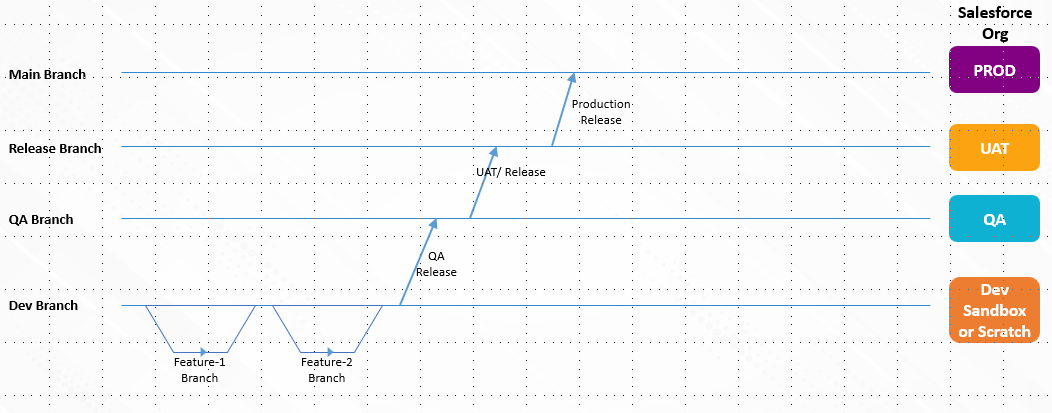
Repository Branches and Org Setup
When the Salesforce metadata is residing in a repository, different branches of the repository typically correspond to different Salesforce orgs. Example: when you have a Production org along with UAT, QA and development sandboxes, you could map those to corresponding repository branches as below.
Objective
The end result we are looking for is an automated setup where merging of a pull request in Azure repo will trigger deployment of the metadata to the corresponding org. E.g. When a pull request is merged in the QA branch, a release with the changes should be deployed to the corresponding Salesforce QA org automatically. The sequence of events will look something like this:
- Developer creates a feature branch from QA branch
- Developer develops the feature and tests it in a scratch org or developer sandbox
- Developer checks-in the modified code/metadata to the feature branch
- Developer raises a pull request to QA branch to move his/her changes to QA
- A lead receives the pull request and he/she reviews the pull request in Azure Repo
- Lead approves the pull request in Azure Repo, which triggers the feature branch merge into QA branch
- This should trigger an automation which will take the approved, modified metadata and deploy it to the QA org using Azure Pipeline
Steps
To achieve the above objective, following steps are needed
- Create a self signed certificate. We will need to use it in the connected app later to authorize with Salesforce. We will use the steps outlined on Salesforce Developer site to create a certificate.
- Install OpenSSL on your computer
- Generate a private key and store it in a file called server.key.
- openssl genpkey -des3 -algorithm RSA -pass pass:SomePassword -out server.pass.key -pkeyopt rsa_keygen_bits:2048
- openssl rsa -passin pass:SomePassword -in server.pass.key -out server.key
- Generate a certificate using the server.key file. Store the certificate signing request in a file called server.csr
- openssl req -new -key server.key -out server.csr
- openssl x509 -req -sha256 -days 365 -in server.csr -signkey server.key -out server.crt
- This server.crt is the certificate file we will use in next step
- Create a Connected App in Salesforce. A connected app is a framework that enables an external application (Azure DevOps in this case) to integrate with Salesforce using APIs and standard protocols, such as OAuth. In the connected app, fill up information as follows
- Enable OAuth settings
- Callback URL = http://localhost:1717/OauthRedirect
- Use digital certificate: upload the above server.crt file.
- OAuth scopes: Access and manage your data (api), Access your basic information (id, profile, email, address, phone), Perform requests on your behalf at any time (refresh_token, offline_access), Provide access to your data via the Web (web)
- Assign the connected app access to the appropriate profile of the user being used for Azure connection.
- Note the clientid of this connected app. We will need to configure this on Azure side.
- The above steps have enabled you to set up Azure integration on the Salesforce side. Now, we will move on to the Azure DevOps side to complete the setup
- Set up your Azure DevOps account and create a repo with appropriate branches. We will use this example to show sync from QA branch to QA org.
- Under Pipelines>Library, create a new variable group. We will use these variables to store information needed to authenticate. Create following variables
- sf-clientid-qa: use the clientid of the connected app from salesforce.
- sf-username-qa: provide the salesforce username of the user to be used for integration.
- sf-endpoint-sandbox: https://test.salesforce.com
- Under Pipelines>secure files upload the server.key file generated in the first step. We will use this during authentication
- Create a pipeline
- Select Azure Repos Git as your code source
- Select a starter pipeline to get a sample YAML pipeline
- Finally, modify the Azure pipeline YAML file to do the automatic deployment on branch merge. The pipeline will have the following steps
- Define the trigger for the pipeline. This will be the name of our repo branch
- Reference the variable group created earlier so we can use variables from it
- Download Node.js,
- Install Salesforce CLI on using npm
- Login to Salesforce using the previous configured setup
- Deploy the metadata from given branch to the target org
- The YAML file for this pipeline will look something like this
| trigger : – QA variables: – group: mask-salesforce pool: vmImage: ‘ubuntu-latest’ steps: – task: NodeTool@0 inputs: versionSpec: ’14.x’ # replace this value with the version that you need for your project – script: sudo npm install @salesforce/cli –global displayName: “Install Salesforce CLI” – task: DownloadSecureFile@1 name: serverkey_qa inputs: secureFile: “server.key” condition: and(succeeded(), eq(variables[‘Build.SourceBranch’], ‘refs/heads/QA’)) – script: sudo sf org login jwt –username $(sf-username-qa) –jwt-key-file $(serverkey_qa.secureFilePath) –client-id $(sf-clientid-qa) –instance-url $(sf-endpoint-sandbox) displayName: “Login into Salesforce QA Sandbox” condition: and(succeeded(), eq(variables[‘Build.SourceBranch’], ‘refs/heads/QA’)) – script: sudo sf project deploy start -o $(sf-username-qa) –source-dir ParentDir displayName: “Deploy to Salesforce QA Sandbox” condition: and(succeeded(), eq(variables[‘Build.SourceBranch’], ‘refs/heads/QA’)) |
To test the above pipeline, create a pull request to QA branch from dev branch. The pull request will contain the metadata corresponding to the feature developed. Review and approve the pull request in Azure Repos and then verify that the merge of pull request triggers the above pipeline and deploys the checked-in metadata to the target org.
Summary
To conclude, setting up a streamlined DevOps process can help predictability and stability to your Salesforce environment. The additional overheads are worth it if you have a steady stream of regular releases in your environment. Until Azure Repos are natively supported in Salesforce DevOps Center, you will find the steps mentioned in this article useful.


