- Stronger Customer Relationships
- +1-949-878-7411
- ramana@varasi.com
Using Process Automation to Show Dynamic Page Layouts in Salesforce

Process automation in Salesforce empowers Admins & Superusers to automate business processes. Process automation is about simplifying manual processes and its effect on making these tasks consistent, predictable and error free is very valuable to business. In this article we show how you can use process builder to dynamically switch to the right page layout.
For example, take tasks like sending a reminder email to customers for contract renewals and creating a task to follow up with leads in order to convert them to an opportunity. These tasks can be performed manually but is prone to errors and omission. Getting consistency in some of these tasks can have a big impact on customer satisfaction and relationship.
Salesforce provides you with a great process automation tool – Process Builder. Process Builder runs on flow engine with a very intuitive user interface enabling you to easily configure business logic along with enhanced actions.
Let us consider a scenario:
A Level-1 support agent is handling a case that needs to be escalated to Level-2 team for investigation. A simple change in status achieves this escalation. The Level-2 support agent requires more information from the Level-1 agent regarding the troubleshooting that has already been done on the case. There are a few fields to capture this information that are required only when the case is being escalated. We also want to assign the case to Level-2 support queue.
This above scenario needs certain additional fields to be captured on the same case record only when the case is being escalated. This can be achieved by using record types and page layouts. Process builder can be used to change the page layout dynamically.
When the Level-1 agent escalates the case to Level-2 by changing the case status to “Pending Level-2 Support” manually, it should trigger the following process automation:
- Change the case record-type and subsequently the page layout to show the additional fields required by the Level-2 agent.
- Assign the case to Level-2 support queue
Before we configure the process automation, we assume there are two record types and two page layouts on the Case Object. Below are the steps to setup the process automation:
- Go to Setup | Create | Process Builder | New | Enter the Process Name
- Click on Add object and enter the object name
- Click on Start the process : Choose When the record is created or edited
- Click Save.
- Click on Add Criteria : Enter the criteria name
- Under Criteria for Executing Actions : Choose Conditions are met
- Under Set Conditions option, mention Case Status equals to “Pending Level-2 Support” (Enter Your Own Criteria as per your business needs)
- Click Save.

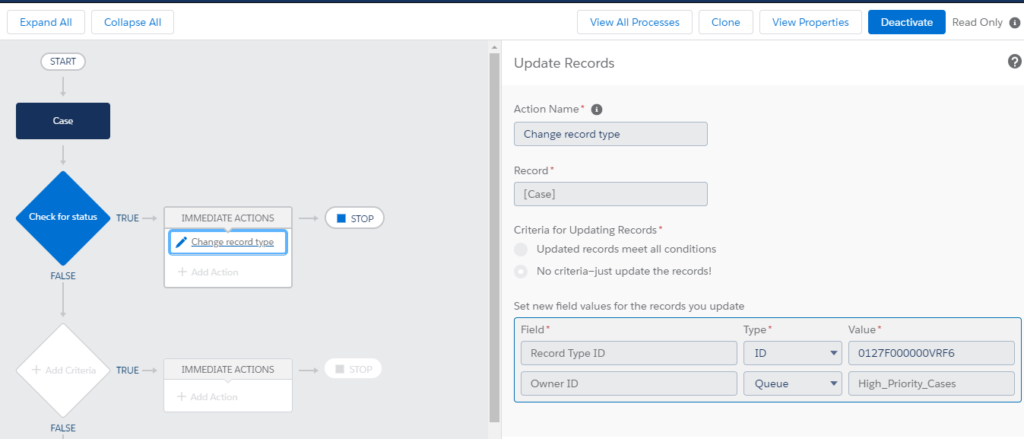
- Click on Add Action : Click Update Record
- Enter the action name
- Select Record Type : Choose “Case record that started your process”
- Choose Field : Record type ID
- Type : ID
- “Paste your 15/18 character record type ID” (this will be available on the Case->Recordtypes-> click on record type and you will see the RecodtypeId in the URL)(https://xxxx.salesforce.com/setup/ui/recordtypefields.jsp?id=0127F000000VRF6)
- Click Add row and choose Field : Owner ID
- Type : Queue
- “Enter your queue name”
- Click Save.
- Save and Activate the process
- Edit & Save any record of the object in which you have created this process .
This was an example of how you can use the power of the platform through configuration and make the system easy to use and adapt to your business processes.
Team Varasi


